How to Transfer Your Domain Registration to DreamHost (4 Steps)

So you’ve got a website. Or maybe you juggle multiple websites and domain names. Perhaps you’re unsatisfied with your current registrar, or you’ve found you’re managing too many different things in too many different places.
If so, it might be time to consider transferring your domain registration. And you might want to consider transferring it to DreamHost.
Get Content Delivered Straight to Your Inbox
Subscribe to our blog and receive great content just like this delivered straight to your inbox.
Why You Should Consider Transferring Your Domain to DreamHost
1. You Want to Manage Everything in One Place
A while back, we surveyed some of our customers, and they told us the No. 1 benefit of using DreamHost was that it gave them the ability to manage as much as possible in one place.
More specifically, 60% of customers we asked said the main benefit of using DreamHost was the ability to manage several websites and domains from a single location.
So if you are running several websites under several different registrars, moving them all to one place would make life a whole lot easier.
2. You’re Being Charged Too Much for Renewals
Like any service, prices vary, and those costs can increase when it’s time to renew. If you feel you’re being charged too much for domain registration renewals, the obvious solution is to change registrars.
3. Support is Lacking
As with price, the support offered by different service providers varies a lot. If you’re not getting the help you need from your current registrar, it may be worth moving to one that can fill the gap (like DreamHost).
4. You’d Like to Move a Domain from One DreamHost Account to Another
If you run many websites, there’s always a chance you’re going to be taking over a domain owned by someone using DreamHost. Should this happen, we allow you to transfer domain ownership from one person to another quickly and with minimal effort.
In this situation, the easiest solution is just to continue using DreamHost (and potentially move your other domains over too).
Related: How to Choose the Best Domain Name (11 Key Tips)
Need-to-Knows When Transferring a Domain
Understanding what is and isn’t possible when transferring domains can save you tons of time further down the line and help ensure a smooth and pain-free domain transfer.
With that in mind, here are a few things you need to know before you start the process of transferring a domain registration.
1. Only Certain TLDs Are Allowed
At DreamHost, we support certain TLDs for transfer. However, it’s actually only a handful of TLDs that cannot be transferred. These are: .AM, .AT, .BZ, .FM, .JP, .NET.NZ, .ORG.NZ, .NGO, .ONG, .OOO, and .WS.
For more information, you can check out DreamHost’s TLD page for a current list of domain extensions with pricing.
Additionally, there are also some New TLDs and ccTLDs which are considered premium domains — for example, .LIVE, .ME, and others. DreamHost cannot accept transferring premium domains due to the pricing structures that vary from one registrar to another.
If you’d like to use a premium domain for your website, you’ll need to register it directly with Enom or another registrar that sells premium domains. Then you can host the site on your DreamHost account like any other domain.
Related: The Complete Guide to New Top-Level Domains (TLDs)
2. Beware of the ICANN 60-day Transfer Lock
Did you know you can’t transfer your domain during the first 60 days of registration? You need to wait until day 61.
It’s also worth remembering that you cannot transfer a domain if your last transfer took place within the previous 60 days.
And remember, transferring a registration only moves your domain. If you’d like to transfer your web hosting service to DreamHost, we can help with that too.
3. Downtime Can Happen If You Don’t Get Your Nameservers Sorted First
It’s important to know that if you decide to change your nameservers to DreamHost after completing a transfer, you may experience some downtime. Changes to the nameservers cannot be made while the domain is pending transfer.
We recommend that you start the transfer at least a month in advance — this will make sure your domain registration does not expire during the transfer.
What Should You Do Before You Request a Domain Transfer?
We recommend completing three super simple steps before you make your transfer request. This is because of ICANN’s Transfer Policy, which means that following a transfer, changes made to the registrant’s name, organization, or email address will be put on a 60-day lock.
- Unlock the domain registration. This is done with your current registrar.
- Obtain the auth code, also known as the EPP. You can get this from your current registrar.
- Remove WHOIS privacy. This is done through your current registrar. This allows your new registrar to recognize the new owner.
Now you’ve completed all the preparation, it’s time to transfer your domain to DreamHost. The whole process is pretty simple, but just to be sure, here’s what you need to do.
How to Transfer Your Domain to DreamHost in 4 Steps
Four steps — it’s that easy! Let’s walk you through the process of transferring your domain to DreamHost.
1. Request the Transfer-In With Dreamhost
Start by logging in to your DreamHost account. You can do that here. If you don’t have an account yet, you can create one here.
From there, you are going to need to navigate to the Reg Transfer page. There you will find a button labeled Start Transfer to DreamHost — click that.
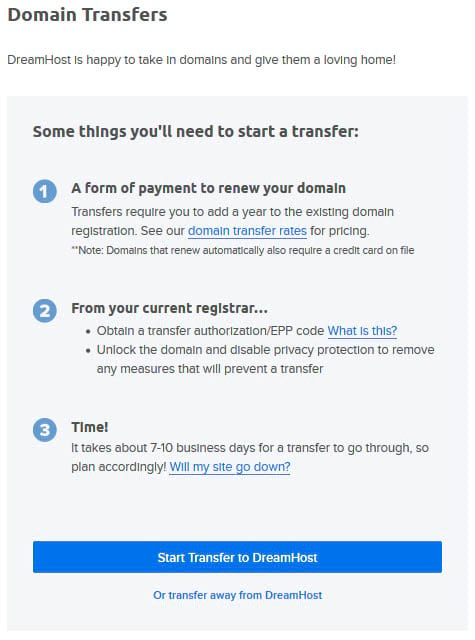
Have you done that? Cool. You should now see this:

In this section, all you need to do is add the domain(s) you would like to transfer to DreamHost and click Request Transfer.
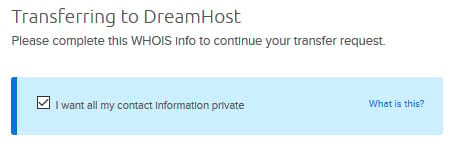
2. Enter your Auth Code, WHOIS Info, and Nameservers
Now you need to fill in details to show you are the owner of that domain(s). If you want your contact details to stay hidden, just tick the I want all my contact information private button.
This is free, by the way. We don’t like unnecessary charges!
You should now see a section asking you to enter all your WHOIS information. As you might suspect, you need to make sure all your details are valid and correct and that you have followed the ICANN policy we mentioned earlier.
The WHOIS section looks like this:
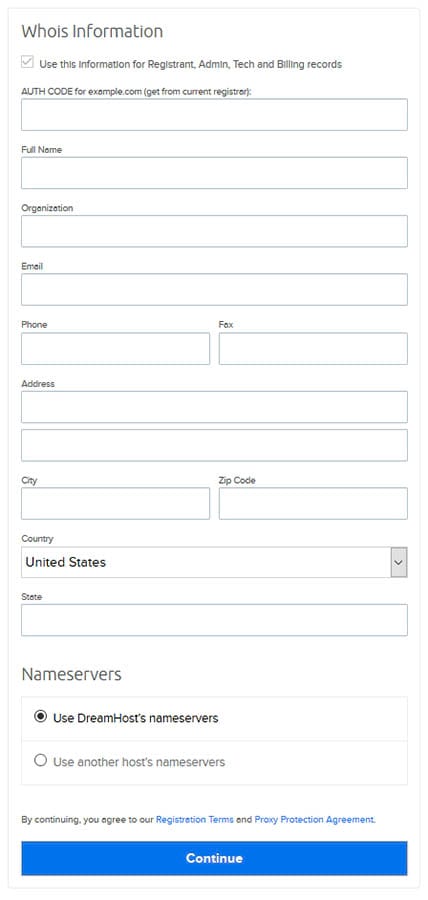
See that little checkbox at the top? If you click that, it will use these details to automatically fill in the four contact fields on the domain registration’s internal ownership details. These are:
- Admin
- Billing
- Registrant
- Technical details
The following section is the Auth Code field.
Your current registrar should have provided you with either an Auth Code or EPP code. Make sure you fill in the fields with the code exactly as provided to you.
Once that’s done, you should see the following:
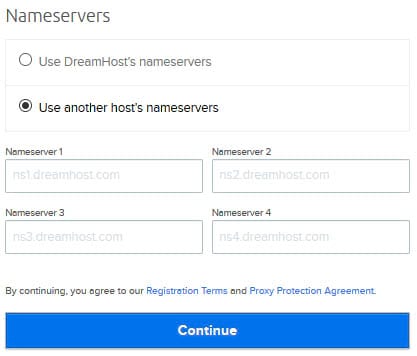
Choose either Use DreamHost’s nameservers (this automatically sets DreamHost’s nameservers for you) or Use another host’s nameservers (you should choose this if you’d like to enter outside name servers manually).
Make sure you have read the Registration’s Terms, and click Continue.
You now need to pay for the transfer.
Related: A Beginner’s Guide to Domain Name Registration
3. Pay for Your Domain Transfer
If you have a free domain registration with your current registrar, you won’t be charged by DreamHost. If you don’t have a free domain registration, you will need to pay for it here.
To complete this step, you first need to review your order.
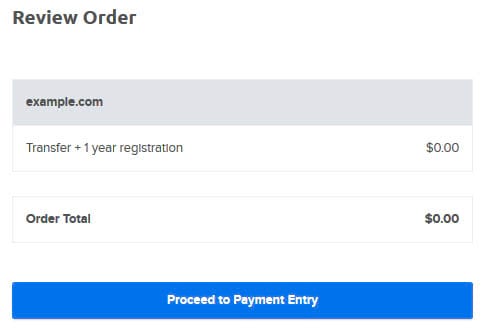
If you need to pay for the transfer, you will know because the fee will appear in the Order Summary.
Click the Proceed to Payment Entry button. You then need to confirm the payment, so press the Submit Transfer Request button.

On the next screen, you simply need to enter your payment details and click the confirmation button. You should now see that the transfer has been initiated.
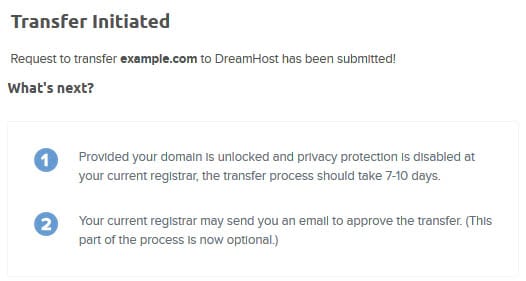
Navigate to the Reg Transfer page, and if all is well, you will be able to see confirmation that the transfer is pending.
When the transfer has completed, payment will be taken from your bank account.
Let’s move on to the last step.
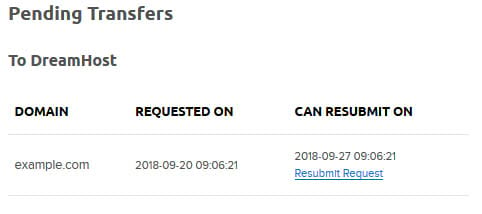
4. Check That the Domain Status and EPP Code Are Verified, and Transfer Request Is Submitted to the Current Registrar
Once the transfer is completed, the authorization code and EPP are verified with your current registrar.
The registrar then has five days to release the domain to DreamHost, and the transfer will complete within the seven days after.
You can confirm the status by running a quick WHOIS check. If the transfer fails, you can get more help by contacting our support team.
There you go — four simple steps as promised!
That said, there are little things that can go wrong. Let’s discuss some of the most common domain transfer problems our team here at DreamHost comes across and how they can be fixed without needing to contact support.
Search DreamHost’s 400+ TLDs to find the perfect URL for your website.Ready to Switch Your Domain Registrar?

3 Common Domain Transfer Issues
While the steps involved in transferring a domain are simple, that doesn’t guarantee everything will run without a hitch. There are several factors involved, and if you have issues, it could be for one of the following reasons.
- Some domains update their auth code internally. For example, the .org registry has many security measures and can often change EPP codes automatically. If you see this happening, you need to contact your current registrar. You’ll then need to reset the auth code and resubmit the domain transfer request.
- Some domains are transfer locked. You can establish whether this is an issue by looking at the WHOIS information and checking for the following: Domain Status: clientTransferProhibited. If you see this, you’ll have to contact your current registrar to have it unlocked. Once that’s done, you then need to resubmit the domain transfer in DreamHost.
- Intermittent issues with the DNS. After a transfer, you may see this issue. This is usually down to domains having previously used DNSSEC. Find out how to fix it in this article.
Still running into issues? Check our Knowledge Base or contact support.
Master Your Domain at DreamHost
It’s not uncommon for website owners to start with one domain registrar and later move to another. Over time many of us realize we rushed the initial registration process, didn’t do due research, and wound up being charged too much for too little.
If this includes you, moving your domain registration — to DreamHost or any other registrar — is much simpler than you might at first think.
In short, you simply need to:
- Request the Transfer-In with DreamHost (or your chosen registrar)
- Enter the auth code, WHOIS, and nameservers
- Pay for your transfer
- Wait for your domain status and EPP code to be verified and for your transfer request to be submitted to your current
If you’d like to register a new domain, we can help with that too! DreamHost .COM domains cost $7.99 a year and come with free, private registration, while other domains start from less than $1/year. Find out more here.
